Review: DLP Projector
Optoma ThemeScene HD72i
The low-priced DLP alternative for HDTV HomeTheater
Regardless of many discussions about the different projection techniques and
their pro and cons, the large success of LCD technology over the last two years
has had a positive influence on the price history on the projector market for
the consumer: the price/performance ratio has never been as good as it has been
this year.
Obviously DLP-projector manufacturers see this and have taken action to present their current HD-ready models at fair and favorable prices. Newest caper from the house Optoma is the HD72i.
With a native resolution of 1280x768 pixels and a price of approximately €2200. - it is one of the most favorable HD DLP Home Theater projectors one can purchase at present. We took a closer look at the projector, in order to see whether or not compromises were made with regard to quality in this price range.
We refer in advance to our test criteria, which are described in detail in our Know How Special: "Projectors / Plasma TV's - Quality aspects".
1. Equipment and Technology (Know How Link here)
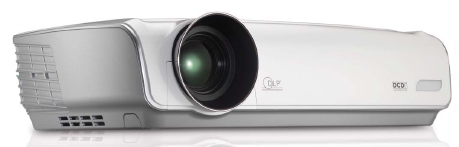
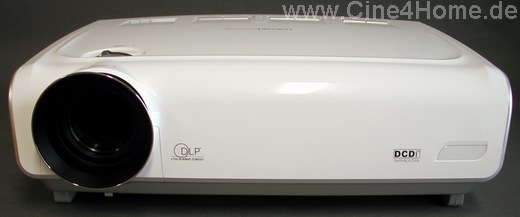
With their past models (H79 and H57) Optoma was particularly noticeable regarding design: there was none! Unquestionably technically convincing, optically they were rather white "shoeboxes" without refinement. But slowly, projectors are growing out of the hobby corner where enthusiasts set technical efficiency before design; meanwhile it must be prepared also for elevated aesthetic requirements in living rooms. Optoma engineers had the same view on this because the chassis of the HD72i surprises with an elaborate but at the same time decent design.
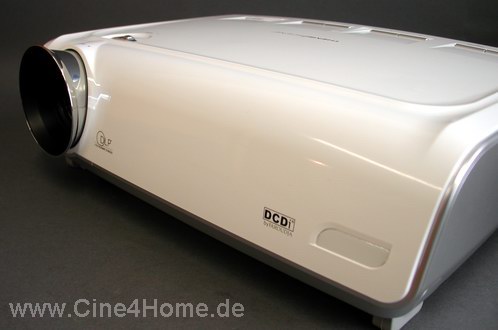
The white polished exterior works very well, and adapts uncomplicatedly to the ceiling and wall color. The shining surface provides a high-quality impression. The sides are set off in silver/anthracite coal and underline the modern however not importunate design.
The optics of the projector need a little getting used to: it is made out of chromium-plated sheet metal and it's funnel form a little reminiscent of a horn.
All in all Optoma has made enormous progress in the right direction regarding design, only on very close examination small deficits here and there are noticeable. A particularly disturbing detail is a green light emitting diode on the top side, constantly flashing while in standby; this could be very distracting in a living room, especially at night.
1.1 Technology (Know How Link here)
All favorable HD-DLP projector have one thing in common, in them resides the new 1280x768 pixel DMD from Texas Instruments for the imaging. This is not only sufficient for the representation of HD material, but also for the uncropped display of XGA PC signals (1024x768). The 16:10-format panel thus makes the projector an all rounder for spare time and business.
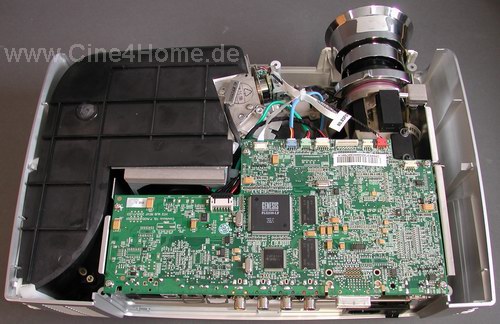
The internal structure is always interesting with DLP projectors, since it not rarely varies. We opened up the HD72i, in order to explain its technology:
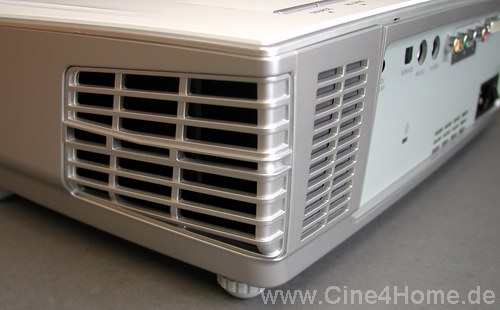
After opening, the particularly large air duct on the left is immediately noticeable, next to that are the optical path and the signal processing electronics.
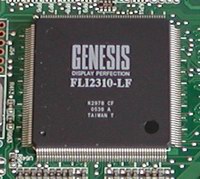
On closer examination of the motherboard, two technical strengths of the projector become clear: On the top side is the popular Faroudja FLI2310 processor, which usually provides for outstanding de-Interlacing.
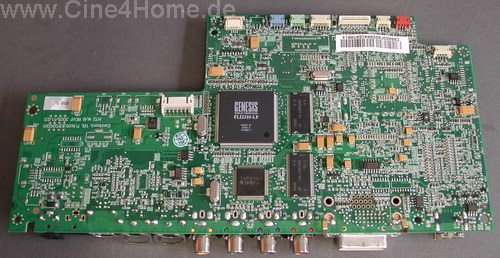
Plate top side with genesis FLI2310
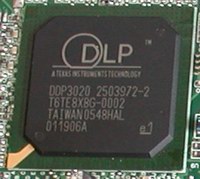
De-Interlacing is increasingly neglected lately with projectors, which is why we want to emphasize this technical expenditure with praise, especially in this price range. On the plate lower surface the DMD control chip is of special interest. We were positively surprised here also, in the HD72i the new DDP3020 is used, which in relation to conventional variants offers a qualitatively increased 10bit signal processing.
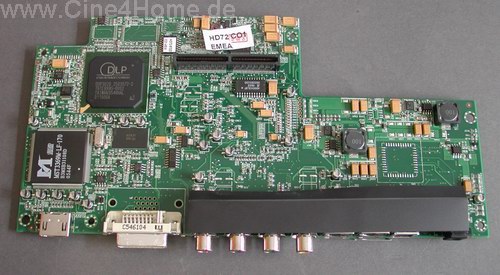
Plate lower surface with DDP3020
Until now the technical characteristics of the projector are very promising. We continue with the internal structure, which becomes visible after removing the motherboard.
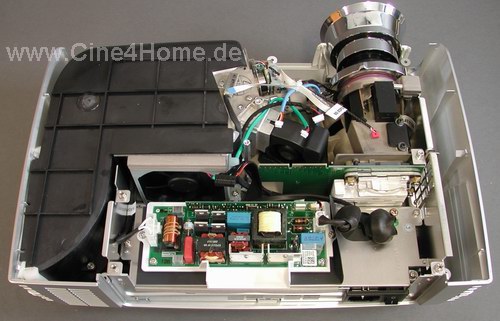
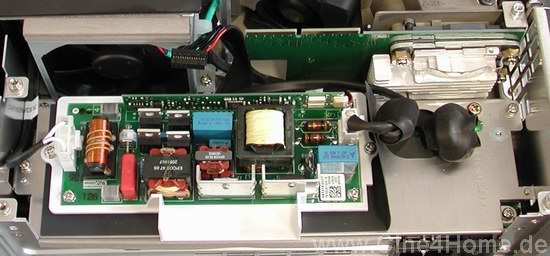
Directly under the motherboard are the power components for projector and lamp (picture above). In the upper right quarter is the entire optical path, which in the case of the HD72 is uncommonly compact.
The light engine of the HD72i
The path of imaging is quickly summarized: The necessary light is produced by a 220 Watt lamp, which with a life span of up to 3000 hours operates economically.

Lamp of the Optoma HD72i
We were not pleased to notice that the lamp-module is open laterally (picture above). In the case of a lamp burst, glass fragments can easily make their way into the projector, which afterwards must be removed toilsomely again. A closed lamp module, as most other projectors offer, would have been clearly better.
The lamp light is filtered at the beginning of the optical path by a color wheel. In the case of the Optoma beamer it concerns a 7 segment RGB-W-RGB color wheel. It is to obtain accurate colors and high contrast at the same time.
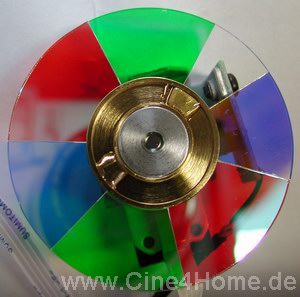
In the picture above the color wheel can be seen with its white segments, which consists simply of transparent glass. The red filters are increased a little, in order to adjust to the lack of red of the lamp in a certain measure. The relatively large green segments however show that the emphasis was not put on color optimization, but on brightness.
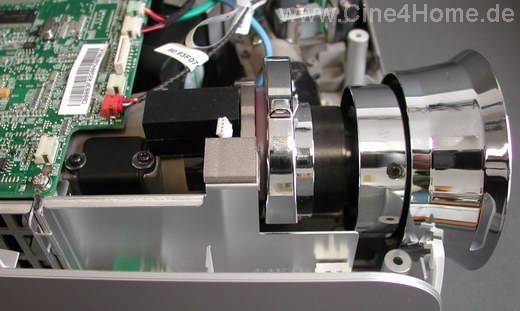
After passing the color wheel the light arrives into the actual optical path, which in the case of the HD72 is short and encased very well.
Color wheel, behind it the optical path
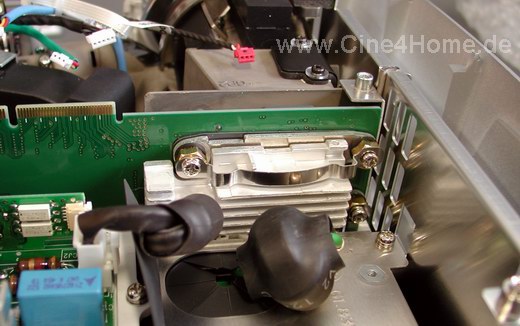
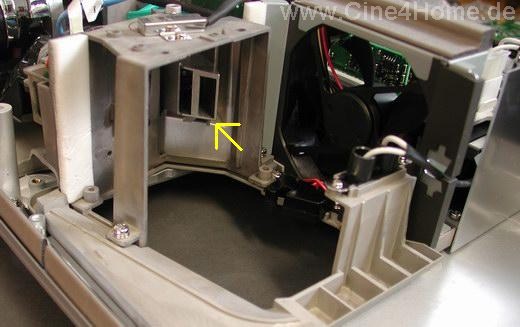
By different lenses and mirrors the light finally arrives into the "picture chamber", in which the actual DMD for the imaging resides. It is placed directly opposite of the projection optics.
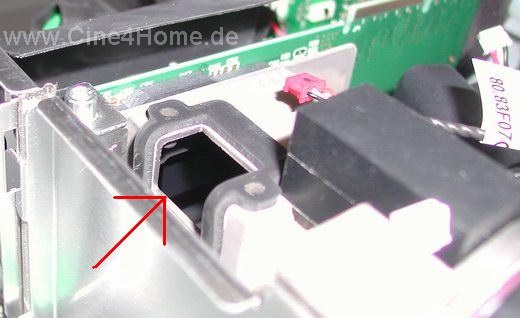
In the picture above the chamber with the DMD chip (arrow) can be recognized: it produces the different brightnesses for each pixel individually by different tilting frequencies. The light is reflected as by a mirror and finally arrives into the actual projection optics.
The remarkable projection optics
The enormous quantity of light in a small area as well as the fast control frequencies make cooling an inevitability. The chip is secured by a large passive radiator on the back, which constantly derives the heat.
The radiator of the HDTV DMD
The cooling principle of the HD72i is particularly well thought out: as can be seen in the picture above, air vents are placed directly beside the DMD radiator box. The necessary cooling air is sucked in directly. Further cooling slots are on de bottom of the equipment, with a grille placed in front of it.
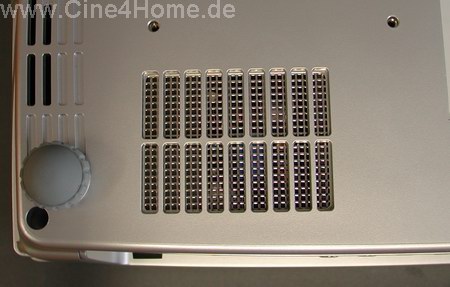
Both air intakes are directly adjacent to the DMD
After passing the DMD radiator box, air flows past the power components plate, which are cooled likewise by the draft of air.
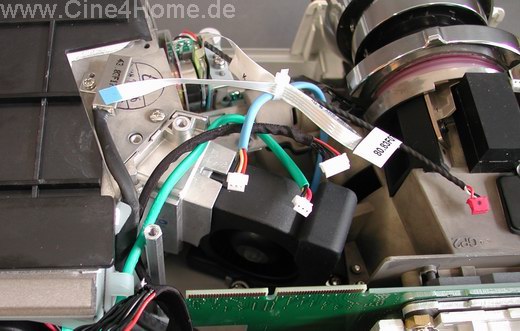
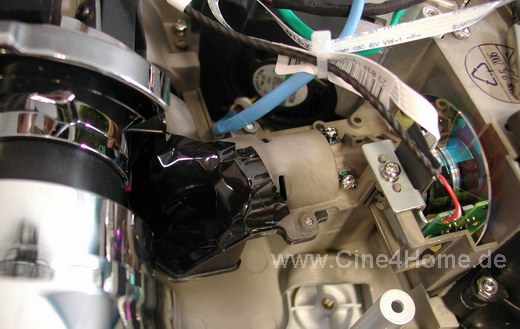
Directly beside the power plate is an exhaust fan, which by its size provides quiet revolutions with much air movement. This exhaust fan continues to lead air directly to the lamp module.
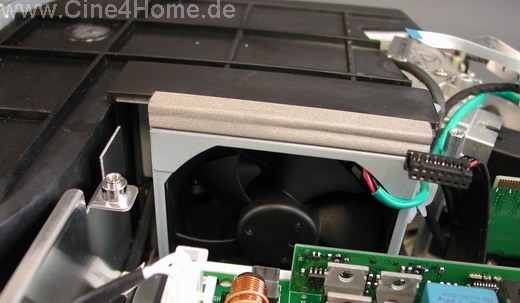
The fan sits directly in front of the lamp
We removed the lamp and the plastic covering in order to make the principle clear also from the opposite side.
The exhaust placed directly beside the lamp
The cooling is supported by a second exhaust, which directly supplies cooling to the lamp by a small air duct (yellow arrows).
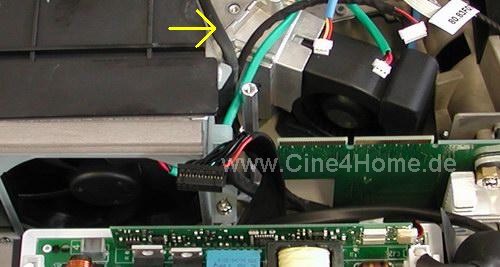
Both exhausts in an overview
The exhaust air duct is particularly well thought out. Its S-shape provides for an extended flow of air, whereby the audible volume is clearly reduced.

The black exhaust air duct of the HD72
Inside is a honeycomb structure made of metal, which is to avoid disturbing air turbulences. The honeycomb structure is placed directly beside the lamp pit.
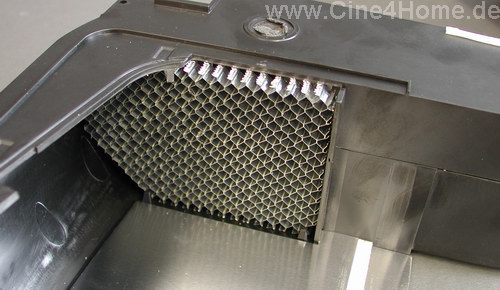
The honeycomb insert in the exhaust air
duct
Down: view from the lamp pit on the equipment lower surface
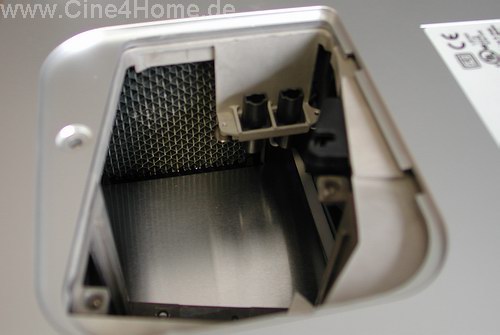
Air warmed up by the entire machine is finally led out at the left back from the machine.
The ventilation exhausts of the Optoma
This simple but well thought out principle shows a considerable effect in
practice: the Optoma HD72i is a pleasantly quiet DLP projector, which hardly
disturbs the film presentation by background noises. It is not as quiet as its
both actively and passively cooled larger brother H79, but this is in another
price range completely.
The technical structure of the Optoma HD72i shows some technical strengths: signal processing consists of high-quality components such as the Faroudja de-Interlacer and the DDP3020 DMD controller, the optical path is good and encased and by an intelligent structure pleasantly quiet. To criticize is the lamp module without protecting glass bulbs
1.2 Connections / Signal types (Know How Link here)
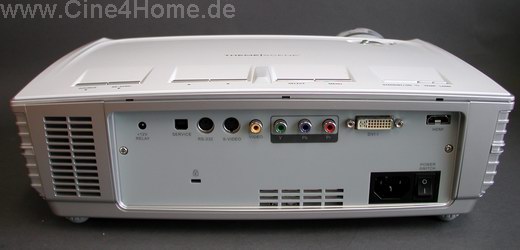
With regard to connections, many projector manufacturers have learned a thing or two. Where in former times usually only one high-quality input was present, now each signal type has its own set of inputs available. For some time however we ourselves wished for more digital inputs (DVI/HDMI), since the digital transmittal mode is not only qualitatively the best, but becomes almost mandatory with new standards such as HDTV. DVD Player, satellite-Receiver, HD-DVD, BlueRay and even the Playstation3 are all potential digital sources with which a current projector will be confronted.
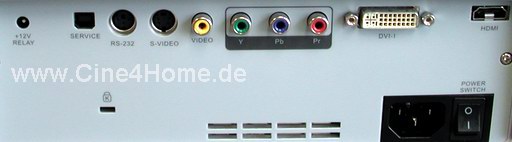
As the first DLP manufacturer at all, Optoma sets an outstanding example, at least in this favorable price range. The HD72 offers the equivalent of two digital inputs: 1x DVI, 1xHDMI. Both inputs are HDCP compatible, so that the projector will be compatible to all sources of picture. This equipment advantage is to be emphasized expressly by praise and we hope that other manufacturers will take this as an example of future models. As small compromise was made by omitting a separate VGA input, similar PC signals can be fed problem-free however over the DVI-I input, which has the appropriate analog pins. Accompanying the two digital inputs are:1x YPbPr (3x RCA), 1x S-Video (Hosiden), and 1x Composite (RCA). Control signals for the automated home cinema experience are provided by an RS232 serial bus and a Trigger-Out. The USB interface is for service only.
1.3 Setup (Know How Link here)
With regard to placement DLP projectors still show clearly less flexibility than their LCD competitors. This unfortunately applies also to the Optoma HD72i. The economical structure of the optical path without glass prism entails a large vertical offset. This means that the projector projects the picture easily diagonally upward (table placement) or downward (ceiling mounting). In addition a mechanical lens shift is missing. Fortunately a "digital Lens shift " creates a little remedy: since the native vertical resolution of the projector amounts to 768 pixels, video representation however only needs 720 pixels, thus 48 pixels remain for the additional vertical off-centering. Those who need more adjustment do not come around tilting the projector. For this purpose all four feet of the projector are adjustable in height.

Adjustable rubber feet
Likewise the zoom range of the projector is not too large, however is sufficient for most room sizes and applications:
Projection distance table "Optoma HD72i"
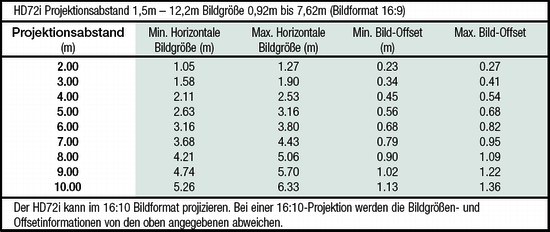
The table above shows both the possible display widths for certain projection
distances, and the minimum and vertical offset, as we explained before.
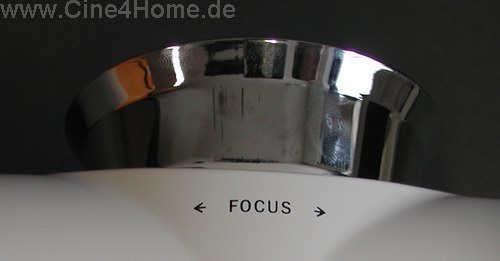
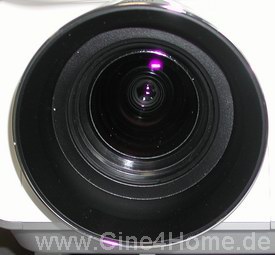
After assembly, Zoom and Focus must be adapted to the screen manually at the optics as last steps. Here the HD72i shows up a little self-willed
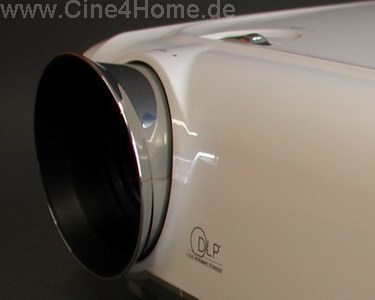
The optics of the HD72
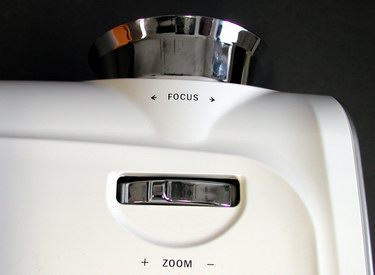
Zoom is adjusted by a lever on the top side of the machine, which translates
very directly and thus permits little fine feeling. Besides that, the picture
immediately becomes diffuse when changing the zoom, so that one cannot recognize
the picture edges directly without after-correcting the sharpness occasionally.
The latter must be adjusted directly at the metallic funnel, which likewise
obtains no fine feeling. This is needed however, because if the optics are not
set sharply to the half millimeter, disturbing color fringing immediately shows
up in the picture. Thus the adjustment requires a little patience, a good result
is possible however.
Regarding placement the Optoma HD72i offers good to average results as usual for DLP projectors. DLP projectors are not able to be as flexible as LCD projectors due to their technical construction, but for most applications of home cinemas with ceiling mounting this should not represent not all too large of an obstacle.
2. Operating the projector (Know How Link here)
So far, Optoma projectors always had deficits in the operation: either the remote control was insufficient in function and/or range, or the menus were a little unclear or the functions not logical in their operation. These lacks have also been tackled by the engineers, to a large extent with success this time.
2.1 Remote Control
The remote control was submitted to a clearly visible improvement. While even the large H79 exhibited only a cheaply looking standard remote control, that of the HD72 shows both design and functionality now.
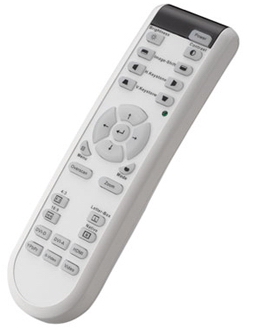
In elegantly polished white with optional lighting it works both in bright and dark rooms and suits the projector. The ergonomics were not ignored likewise, the navigation cross in the center is comfortably controlled with the thumb.
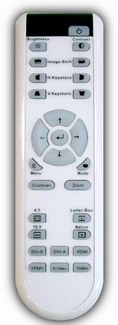
Very clear and structured is also the key arrangement: In the upper third all substantial functions for fast picture adjustment at installation, in the center the control cross with menu keys and in the lower third buttons for format selection and direct source selection buttons. This is how a remote control should be developed, in order to be usable quickly and intuitively in the everyday use.
Something which unfortunately is not so exemplary, is the range of the infrared transmitter. It does not function reflectively off of the screen, so that the remote control always must be pointed directly to the projector. And not only that, one does have to "aim" relatively precisely in order to convey the desired signals to the projector. Especially with ceiling mountings over and/or behind the spectator this can quickly become an annoyance. We cannot understand such deficiencies on video projectors even in this price range, efficient IR transmitters and receivers can not be such expensive electronic circuitry than manufacturers would have to save here.
The functional and at the same time attractive keys on the equipment top side are exemplary again. If the remote control is not within reach, the projector can be controlled directly.
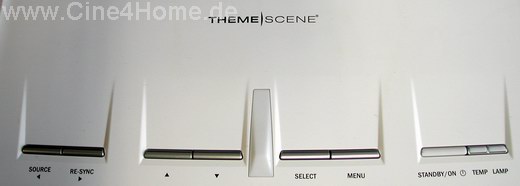
However Optoma should have omitted the constantly flashing light emitting diode in Standby mode. Those who are annoyed by it have no other option than to mask it with tape.
2.2 Menus
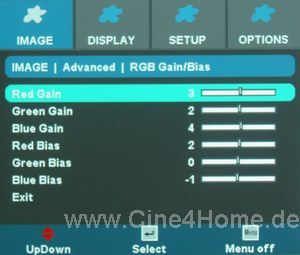
Likewise large progress has been made with regard to the menu structure. Optoma revised the structure completely for the first time in years, both graphically and content wise. All functions are now divided in four main categories: Image, Display, Setup and Options.
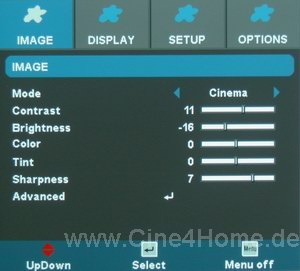
In the screen shot above the "Image" menu is to be recognized. Here all logical primary picture parameters are found such as Contrast, Brightness, etc..... Various Presets for different ranges of application are also present. With "Advanced" a submenu opens with further picture options for professionals.
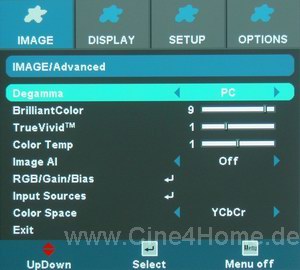
A little disappointing is the function "Degamma", it offers only four different work presets, instead of offering a practical gamma equalizer. "Brilliant Color" sounds promising and is also touted as miracle circuit in the brochures, however it only concerns a kind of white rise. Similar marketing gags are "TrueVivid" and "ImageAI", which we will deal with further in the course of the picture test. The function "ColorTemp" can be used to simply switch the projector between a warm, a middle and a cool image representation. For those who want more precise control, the obligatory RGB/Gain/Bias controllers are at your disposal, which allow for exact adjustment of the color temperature.
A practical function is "Input Sources", which probably slipped inadvertently into the picture menu. Content wise it would have better fitted inside the "Setup" or "Option" menus. It allows quickly setting which inputs of the projector are actually connected to signal sources.
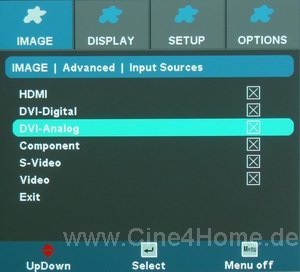
This is advantageous with the automatic source search of the projector, because it simply jumps over the sources which are not connected by the user anyway. This way the automatic search becomes fast and effective. The last function of the Image menu is "Color space", which is to communicate to the projector whether a digital source transmits according to RGB or YUV standard.
We go into the second main category which concerns itself with picture geometry, in an extremely exemplary way:
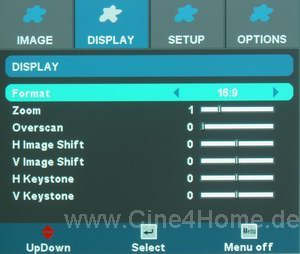
As the screenshot above already shows, all parameters for an exact adjustment at screen and signal source are available here. The designations are partly misleading however. The function "Format" is self-describing; 16:9, 4:3, Native and LBX (LetterBoX) can be selected. "Zoom" is a correct description, however "Overscan" would have been more suitable here. With Zoom the screen window to be displayed can be indicated here and thus the cut off edges be selected. The function "Overscan" hides a Blanking function, with which the edges of the screen can be blackened. This is particularly practical with disturbing signal lines above the picture, caused for instance by TeleText information. With "H/V Image Shift" the picture can be shifted horizontal and vertically. Here the already mentioned digital picture shift is possible, with which the offset of the projector can be varied with video (720p) representation. Lastly, with "H/V Keystone" a skew of the projector can likewise become balanced in both directions.
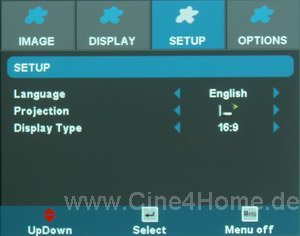
The main column "Setup" (picture above) contains functions which are to be considered during the first set-up of the projector. Apart from language and projection mode (ceiling/table/front/back) the user can select here whether video material with native resolution or HD and format (1280x720/16:9) or full projector resolution (1280x768/16:10) is to be displayed. This is particularly meaningful during the representation of 4:3 signals, since the vertical resolution can be increased here to 768 pixels.

Remaining is the "Options" menu (picture above), in which all remaining functions of the projector are placed. With "menu location" the OS-Display can be shifted within the picture, "Source Lock" forces the projector on the currently selected input, even if no signal is present. With this function the automatic source search can therefore be deactivated. "Auto Power Off" is meant for forgetful users; when this function is activated the projector will switch itself off automatically after few minutes when there is no input signal.

"Lamp Settings" opens a special submenu (picture above) where the lamp hours can be viewed. A memory function with forthcoming lamp replacement can be activated here as well as the "Bright mode". The latter provides for more lamp brightness at expense of the operating volume.
Optoma has made a giant leap forwards with the control concept of the HD72i. Many functions are offered, which are presented graphically appealing and intelligently structured in a clear menu. After few minutes one acclimatized oneself and can exactly control the projector without large problems. Also the remote control is exemplary in its structure. Only the too weak infrared transmitter/receiver is annoying and should be improved at the latest with the next equipment generation.
3. Image test
In the third part of our test we examine the picture characteristics of the new Optoma beamer in detail as usual...
3.1 Screendoor / Pixel structure (Know How Link here)
Almost all favorable HD-ready projectors of the newest generation use the current 1280x768 DMD from the house Texas Instruments. The picture results however do not support the fact that this chip is less efficient than the DarkChip3. Quite the opposite, with it's increased resolution the DMD used in the HD72 offers more resolution and also supports the uncropped representation of XGA signals.
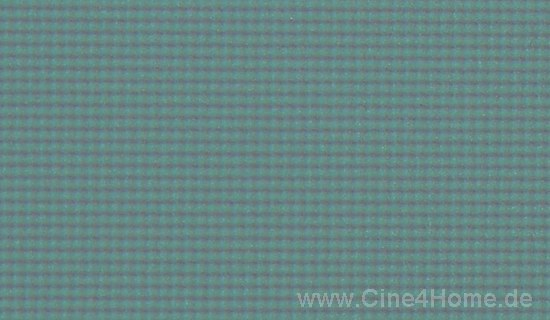
Pixel structure of the HD72i
In the pixel structure the projector does not profit from the increased resolution however, because usually only 720 vertical pixels are used here. HD-DLP projectors however have a good filling factor as standard, so that the pixel structure (picture above) remains invisible to the eye from appropriate viewing distances. Besides this the small convergence shifts, due to the optics of the HD72, decrease the effect by red seams between the pixels.
3.2 Color Space (Know How Link here)
DLP projectors are often said to have particularly strong colors. This impression is obtained more by the high luminosity of the technology however than by an actually strong primary color representation. Because especially with primary color representation compromises often have to be made with single chip projectors.
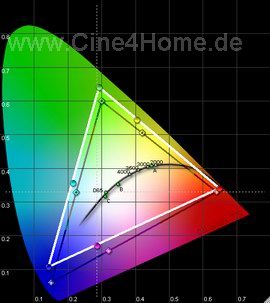
The HD72 has a for DLP projectors very atypical color space: the pale-yellowish greens, which many models accept in favor of the picture brightness, is not recognizable here. On the opposite, it even shows an overly saturated green in relation to the video standard. The naturalness of nature recordings can suffer because of this. Also red is present very strongly, blue however is clearly too "pale" with a tendency towards Cyanide. "Out of the box" the secondary colors are off also, so that the color representation of the Optoma beamer is altogether very strong and appealing, however accurate color reproduction is not ensured in every detail.
3.3 Color Temperature (Know How Link hier)
Essentially important for the correct color blending of the primary colors is the representation of neutral gray tones. They must exhibit a color temperature of 6500K (D65) according to video standard. The more exactly a projector is calibrated on that, the more accurate its color representation to the original (correct color saturation presupposed). Optoma projectors in this domain show a very large series dispersion in the factory calibration. For this reason we checked two review samples.
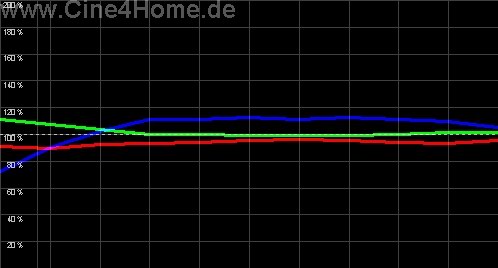
In the picture menu the "Cinema" mode is present, from it one might expect that it was optimized particularly well on film representation. Our measurement does not confirm this unfortunately, the projector shows a lack of red typical for digital projectors, which can be attributed to the high brightness of the UHP lamp.
Cinema-Modus
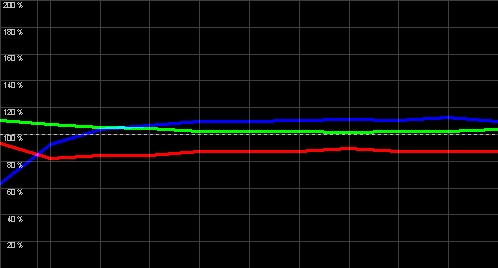
The lack of red of approx. 30% is quite strong, so that the image representation is too cool. Especially face colors clearly lose naturalness. We therefore looked around ourselves in the picture menu whether one can improve the colors simply and uncomplicatedly, without elaborate sensor measuring. And actually, with our review sample it was enough to set the "Color temp" in the extended picture menu to "0". With this setting the projector sacrifices part of its brightness, is however well approximately calibrated on the D65 color temperature.
Col Temp: 0
Both the red and blue deviations are within tolerable ranges, so that no large color distortions can be seen during normal film operation. The eye also more easily forgives the slight blue surplus , than a green or a yellow surplus (like before).
Our second review sample showed a relatively exact white alignment to 6500K however directly in the "Cinema" mode without subsequent changes.
Cinema mode of the second review sample
Apart from that somewhat larger lack of red and blue surplus, this factory setting is quite acceptable, no additional tweaking was particularly necessary there.
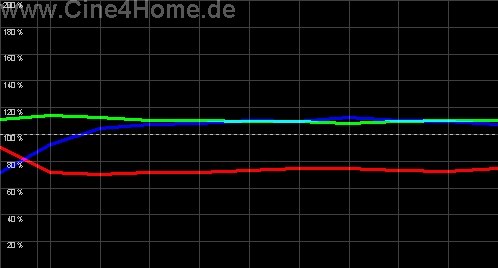
The native color temperature, i.e. with maximum brightness and contrast, shows a slight surplus of green in addition to the usual lack of red, and is typical for digital UHP projectors.
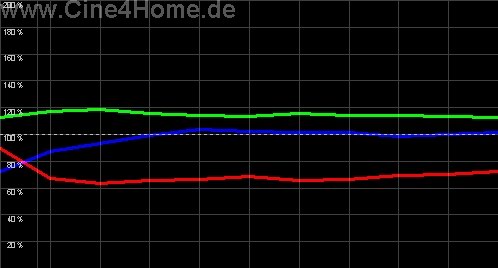
The native color temperature of the HD72i, too much blue and green
The even distribution of the colors throughout all picture modes is worth of praise. The color balance is constant in bright and dark ranges, so that color deviations do not change as a function of the brightness.
For perfectionists among home cinema fans the mandatory RGB-Gain/Bias controller is also present, with which the projector can be tuned to almost any color temperature with the aid of a sensor.
Altogether the concept of rough correction of the color temperature and "fine tuning" by RGB menu is up-to-date and exemplary. Only the large factory dispersion with different devices is cause for criticism, here the customer should ask his specialist dealer before possibly after-corrects to leave.
3.4 Black level, Contrast, Brightness (Know How Link here)
While the LCD camp constantly improves its projectors by improving the panels and "sophisticated" auxiliary mechanisms like adaptive iris to improve black level and contrast, DLP technology steps in place a little here. Regarding on/off contrast and black level they are no longer lonely at the top, despite solid values in both domains. The Optoma HD72i is a good example of this. With it's high maximum brightness, which is sufficient for image widths of 3 meters without restrictions, and an although not great but good black level our review sample reaches a contrast of about 1600:1 on correct color representation. This is a normal value for this price range and technology, but it clearly deviates from the factory specifications however. With the help of the "Brilliant Color" function, which makes the picture noticeably brighter (without recognizable deficits in the color resolution), the contrast is increased a little to 1800:1.
An iris in the focus of the optics is to improve by scattered light filtering
Particularly when the "Image AI" function is applied: it is to adapt the lamp brightness to the picture content real time, a technology that Sanyo introduced two years earlier with it's LCD projectors, at that time with success. The Optoma variant unfortunately did not show such convincing results with our tests: particularly disturbing to us was the exhaust volume, which is directly coupled to the lamp brightness. In the film operation the projector is audibly louder with bright scenes than with dark. This alone will be very annoying to noise-sensitive users. The second circumstance which does not let us classify the AI mode as recommendable, is the fact that with our tests the AI mode is "disabled" now and then, i.e. the lamp simply remains "trapped" in the loud and bright light mode. This is not in the interest of the inventor and especially not the interest of the user; this should be repaired by a firmware update.
Without AI mode, but by maximizing the basic color Gains the maximum contrast the projector can achieve is approx. 2800:1. This is an outstanding value which is not usable in film representation however by the excessive green in the color representation.
But how does the picture depth work with film representation? Surprisingly well, because the projector can out-play it's DLP typical high in-picture contrast at least in dark rooms. The picture works plastic and depending upon picture content very three-dimensional, only the black level disturbingly lightens completely dark scenes here and there. Altogether the contrast characteristics of the projector however are appealing and well up-to-date.
3.5 Luminance tracking / uniformity (Know How Link hier)
A limited contrast range can appear optically outstanding on the screen, if it is used effectively and in accordance with the video standard evenly. Ever more manufacturers allow Gamma Equalizers which are adjustable for different signal ranges, only the DLP camp is still conservative here. As is Optoma, the HD72 offers only four different Gamma presets in its "Degamma menu".
Like always we begin with the option "film" which is obviously for film representation, here the projector should be adjusted as well as possible for film reproduction.
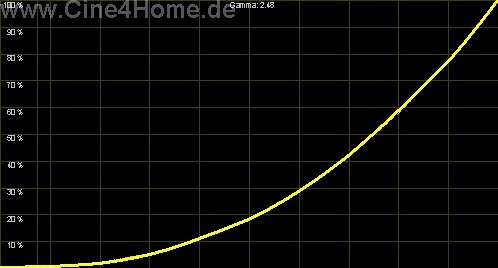
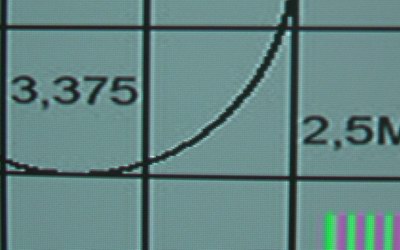
Our measurements result in an exemplary even brightness rise of 2,48. This gamma
distribution, which does not suppress dark details and is also not
over-radiated, is almost optimal for dark home cinema areas with dark walls and
little potential scattered light.
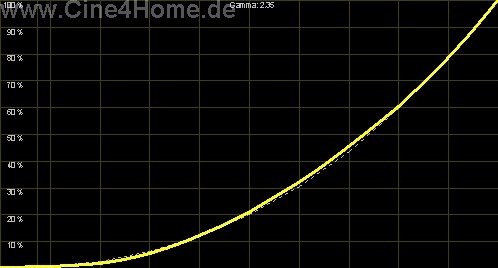
In normal living rooms with bright walls it looks a little different, here the risk exists that dark details of reflected light become "swallowed". Under such conditions flatter gamma curves are more recommendable. However they are not so easy to reach directly with the Optoma. With a little patience and exact tuning of the Brightness and Contrast levels we succeeded in realizing an even 2.3 rise, which is suitable in almost all rooms because of a good coloration.
Altogether with the Optoma HD72 one can obtain a very appealing picture depth with many details, plasticity and brightness it does not have to be ashamed of. More and more exact presets and/or a Gamma Equalizer would be however desirable for future models.
3.6 Sharpness / Brightness uniformity / convergence (Know How Link here)
Now we come to the optical characteristics of the projector, sharpness, illumination and convergence. For this the human eyes are best suitable as measuring instruments.
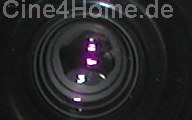
As already mentioned under technology / placement, the optics of the projector are a little difficult to get into grasp. It has to be adjusted millimeter-exactly, in order to avoid softness and color fringing. Good results are possible with a little patience, only what remains is an small vertical convergence shift (Chromatic Aberration), which however is not rare in this price range.
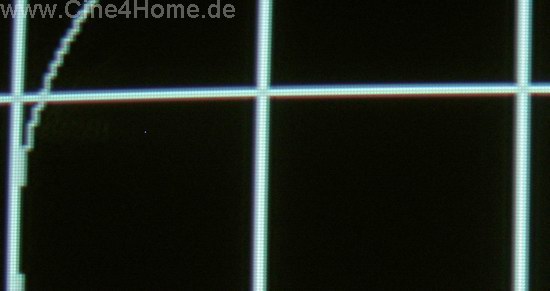
The slight color fringing (picture above) is not noticeably annoying in film operation, only with PC use some details can appear indistinct (small writings).
To the image definition the same applies as to the color fringing: The optics is difficult to adjust, but once one finds the "Sweet Spot", the picture is sharp over the entire surface into the boundary regions.
Absolutely outstanding is the illumination of the picture, even in picture-filling gray tones of low, middle or high brightness is for the eye can not recognize brightness decay towards the corners. The picture is absolutely homogeneous, which especially with PC-applications or Desktops is a large advantage.
3.7 Overscan (Know How Link here)
The developments which can be observed are very pleasing with regard to Overscan. Meanwhile almost all manufacturers (except for few exceptions) have recognized how meaningful it is to make the shown picture variably adjustable for the user.
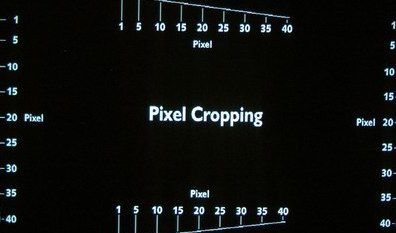
And a particularly good impression the HD72i makes here, its overscan adjustment is named a little misleading as "zoom", but the function is very convincing. From switched off overscan to over 40 cut off (PAL) picture pixels on the left and on the right, overscan can be adjusted in several steps by the user.
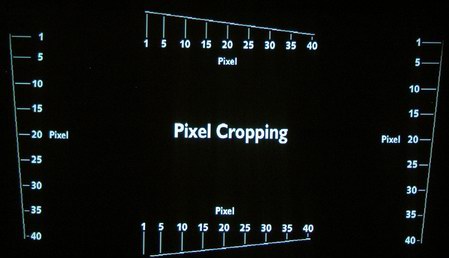
The overscan is adjustable in several steps from switched off (above) to
strong (down)
In practice this variable overscan is particularly useful, especially if one
uses the projector as a television. Not rarely it occurs that a picture exhibits
a black framework on the left or right, which with the help of the function can
become so "zoomed in" optimally , so the disturbing edge disappear.
Additionally the HD72i offers yet another Blanking function however, it is misleadingly named "Overscan". With the help of this function it is possible to change disturbing signal striping to black. The combination of Overscan and Blanking in several steps, offered by the projector, is absolutely exemplary.
3.8 Picture Noise / False Contour / Banding (Know How link here)
Considering the increasing requirements of many home cinema fans, DLP specific artifacts such as picture noise, banding or false contour become ever more substantial. In this category we were particularly curious, since the HD72 uses the current DDP3020-control chip, which already provided for good results in the Mitsubishi HC3000 in this category.
With picture noise the new Optoma beamer shows very good results, only up to a brightness of approx. 12% it shows picture noise and dithering, which from appropriate viewing distances is not an issue however.
With regard to color reductions/banding things are not so completely outstanding. With flowing color changes reductions can be seen, which can lend a digitally artificial character to the film depending upon scene (e.g. Sunset). This is unfortunate, nevertheless the 10bit color processing is actually one of the marketing pro's of the projector.
Also with the False Contour effect the HD72 offers a typical DLP average: particularly with dark camera tilts the projector clear shows double images, visibly suffering sharpness. But also in bright camera tilts this motion softness is perceptible, the faster the movement, the clearer.
With regard to DLP artifacts the projector does not make as much use of the new chip, as for example a HC3000.
3.9 De-Interlacing (Know How Link here)
Only few projectors nowadays have a high-quality de-Interlacer chip from e.g. Faroudja built in. Strangely enough there appears to be a backward trend, away from quality. Apparently manufacturers no longer take the half image processing of a signal source as seriously as before the progressive scan and HDTV times. This is a large error in our view, because those who want to view TV from time to time with hsi/her beamer is dependent on a good de-Interlacer.
Optoma has recognized this and built a Faroudja de-interlacer in the HD72, uncovered by us under technology to be a FLI-2310. But a Faroudja chip does not automatically guarantee a high-quality de-Interlacing, it also does have to be accordingly programmed and merged into the system. The Optoma engineers carried out outstanding work here however. Both with video material and with film material the projector shows absolutely first-class results.
Video material
Video material such as sport, shows, documentaries etc. are processed high-quality by the Faroudja chip as per the Motion Adaptive procedures, so that standing picture elements retain their maximum possible sharpness. With moving elements the DCDi system helps to make diagonal edges finer and so reduce disturbing stairway steps. Especially with sport transmissions this is of great advantage.
Film material
We were particularly enthoused however with the film de-interlacing, since most projectors exhibit large weaknesses here. But with the HD72 everything is correct, it even gets along with 50Hz PAL material and finds the 25-images/sec. rhythm of the originals (accelerated from 24), without problems. Even the most difficult film scenes could not throw the De-Interlacer off. The de-Interlacing of the HD72i is so stable it surpasses many a progressive scan DVD player.
More de-Interlacing one can not expect from a projector, particularly in this favorable price range. We want to especially emphasize our praise on this here and ask other manufacturers for "imitation".
3.10 Details / Scaling / Sharpness
With Faroudja good scaling is also possible, particularly the Faroudja based DVD Player by Denon showed in the past that an almost invisible resolution transformation from PAL to HD is possible. As good as the de-Interlacing of the HD72 is, unfortunately it does not fulfills the high expectations with regard to detail representation. We explain why:
3.10.1 Signal Processing
In case of digital input the signal processing of the projector does not show weaknesses. Free of double outlines also strong contrast transitions with high sharpness are represented. In the case of analog input this unfortunately looks not so good, light double outlines show up, which unfortunately can not be eliminated completely, even with high-quality sources.
Double outlines on analog input
The double outlines can only be fought by a reduction of sharpness, whereby the picture clearly loses detail.
3.10.2 Horizontal scaling
With regard to scaling a similar picture appears: in the case of digital sources the projector offers very good results. It does not convert all resolutions absolutely perfectly and freely from interference as would be possible with a Faroudja, but the results can be described as good.
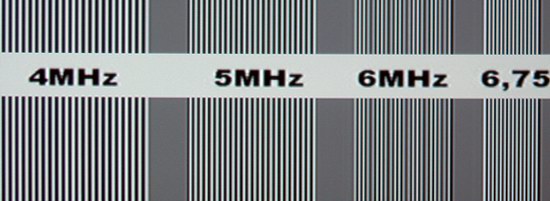
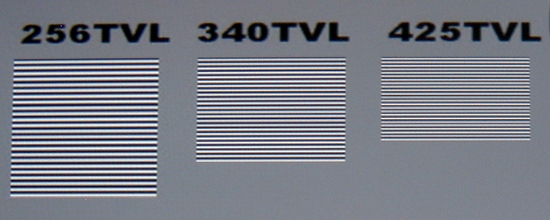
Interference in the 6MHz range
Positive is the sharp representation of the highest resolution range of 6,75MHz, free from any drop in level. This makes the current running picture appear sharp, without working artificially over-sharpened. Again it appears different with analog sources. Here we were shocked by a total drop in level starting from 6MHz, small details are nearly completely swallowed by the projector.
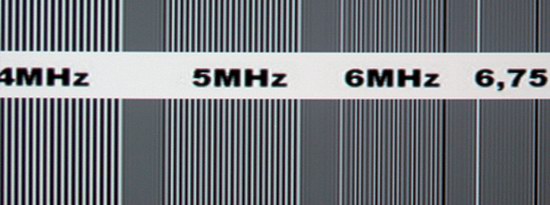
Drop in level with analog sources.
This drop in level causes a clearly reduced detail representation, making the image feel soft. The annoying double outlines do not improve the impression about the picture.
Up to now the digital signal processing appears to be very good, the analog processing has some weaknesses. Now we come to the color resolution. At first sight good results are registered on both analog and digital sources, the resolution of the source signal is not affected.
But on closer examination with digital HDMI (YPbPr) sources a phenomenon was noticeable which reminded us of the Hitachi PJ-TX200: A horizontal "chroma bug". The projector actually exchanges color information in columns, so small colored details clearly exhibit stairway steps.
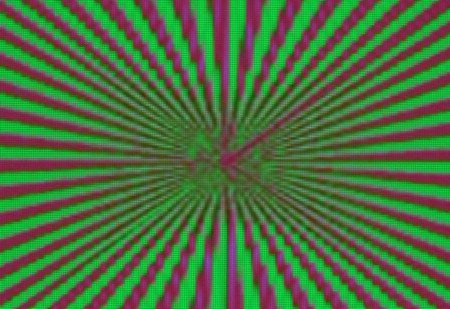
Fraying by wrong color scaling

Those who think that such details are noticeable only in test patterns and are of interest only for "bean counters" are in error. Also in running film, particularly with multicolored scenes, the picture impression can be clouded.

Above screen shot clearly shows how the chroma bug can make itself visible: Both the blue and red outlines show fraying and even double lines, which in each case are to due to the column permutation.
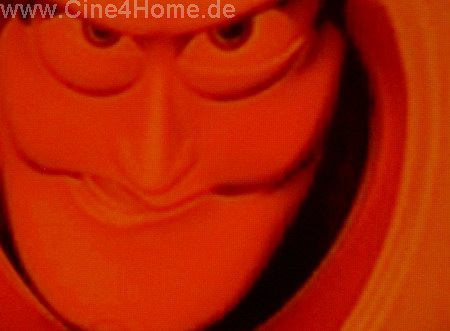
Also Buzz Lightyear clearly shows fraying in eye and chin portions. As is the case for many things such alterations can disturb very much, once one became attentive to it.
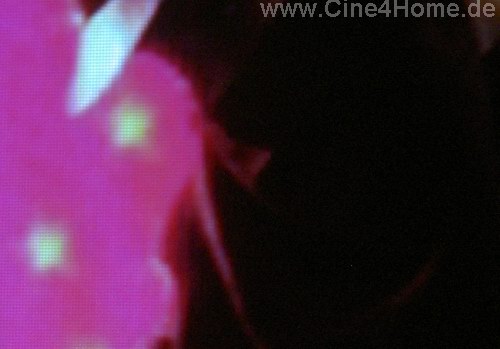
Detail above, this time from "Star Wars",
likewise showing stairway steps
What "Workarounds" are there against this chroma bug? An analog source is not recommended due to the double outlines and the softness. Linderung however provided when feeding 720p material, here the effect is reduced, but not eliminated (as with the Hitachi PJTX200).
Solution of the problem is switching to HDMI RGB and/or DVI RGB. With RGB the color channels will transfer individually and the disturbing picture fraying will disappear.

DVI / HDMI RGB, no fraying
With DVD players this is not problematical, simply switch the Player to DVI or HDMI (RGB) and already the problem disappears. But how is it with future sources of picture such as satellite, BlueRay or HD-DVD? Here everything is still not yet clear whether they will support the RGB standard at all. It remains hoping thus that Optoma improves, particularly since this error could obviously be repaired by a pure software update, before the chroma bug can cause serious problems in the future.
3.10.3 Vertical scaling
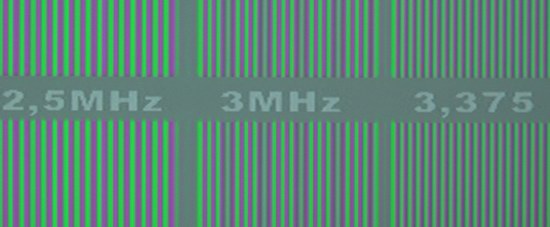
Vertically the resolution of the input signal must be converted from 576 lines (PAL) to the 720 lines of the projector. The projector succeeds with both analog and digitally equally well.
The usual resolutions only few to no interference, so that the film picture does not exhibit disturbing Moirée patterns.
Altogether the results in the detail representation are through-grown: Analog the picture disappoints by annoying double outlines and detail loss. Digitally however the picture is sharp, natural and to a large extent free from scaling artifacts. This applies however only to DVI and/or HDMI -RGB feeds, because with the usual HDMI YPbPr standard the projector produces a disturbing chroma bug, which lets colored details fray.
3.11 Rainbow / Rainbow Effect (Know How here)
For the conclusion of our picture test we like always examine the much discussed rainbow effect. Despite fast color wheels users with sensitive eyes today still complain about the sequential color representation, which can be briefly noticed by the eye with strong contrasts and fast movements.
As discussed in our Know How Special about color wheels, the rainbow effect only becomes inconspicuous enough not to be noticed by practically anywhere starting from a RGB frequency of 300Hz (6x). The color wheel of the HD72i does not work this fast, as at present almost all entry projectors reach a frequency of 200Hz, which, measured by us, corresponds to a quadruple (4x) speed referring to PAL. 200Hz stand for a calm and rainbow-poor image representation, only with very strong contrasts are the color splitting can in parts still be noticed.
Pleasing is the fact that the additional white segment in the color wheel does not strengthen the rainbow effect, as feared by many. Quite the opposite, the representation of the HD72 is surprisingly pleasant for a four-fold color wheel.
Note:
- the rainbow effect is strongly subject to personal feeling. Therefore the following applies: test your own sensitivity in relation to the Rainbow effect before the purchase at the demonstration !
3.13 Picture Evaluation
During the evaluation of the picture we set our well-known emphasis. With regard to black level and contrast the projector does not achieve outstanding results, however does offer the high picture depth typical for DLP which hardly leave anything to be desired for. Only in completely dark scenes deductions must be made. The gamma distribution is appealing depending upon Preset and causes a accurate light distribution in the picture, but the required influence possibilities are small. A little disappointing is the signal processing, which only on digital feeds exhibits the sharpness of the material completely and exhibits a disturbing chroma bug with HDMi YPbPr feeds.
Evaluation Picture overall: 2,2 (Good -) |
|
Black Level & Contrast |
1,9 (Good) |
Gamma Distribution |
2,2 (Good -) |
Sharpness & Interpolation digital/analog |
2,4 (Good -) (due to Chromabug) |
Color Range / Temperature |
2,1 / 2,0 |
De-Interlacing |
1,4 (Very good -) |
Other aspects |
2,2 (Good -) |
(all evaluations refer to the respective kind of projection and the current state of the art. A direct system-spreading comparison is only conditionally possible therefore!)
Color range and temperature are good for a DLP projector, even if the video standard is not completely reached. The factory settings lie within a range however with which ensured an appealing and at the same time natural color reproduction even without big adjustments. The de-interlacing, which makes the HD72 to a genuine secret tip for occasional television users, is really outstanding. The remaining aspects of the test (Overscan, artifacts, rainbow etc..) we have summarized in a note under "other aspects". Here the projector shows predominantly average achievements.
4. Conclusion
Slowly it becomes exciting on the entry level projector market. In the price region of about € 2000. -, which so far has been reserved exclusively for LCD projectors, now ever more favorable HD-DLP projectors come to the market. The Optoma variant shows solid, but not outstanding achievements:
The build is appropriately high-quality and the projector optically pleasing and suitable for many living rooms without reservations. Its technical structure is exemplary with a well thought out and dust-safe ventilation concept, which due to its small noise production is only slightly noticeable. The two digital picture inputs, which are singular in almost all price ranges so far, are absolutely exemplary.
Still the DLP technology is lagging with regard to placement. This applies also to the HD72, which makes a certain measure of space planning necessary with its high offset, missing Lens Shift and reduced zoom range.
In most living rooms of the home cinemas the projector can be integrated however, at least with ceiling mounting. This is clearly made more difficult however by the really unpractical, tiny small tapped holes, which in addition are also outside of its heaviness point, so that one should be recommended a really fitting ceiling mount directly with the purchase from the specialist dealer.
The control shines by its many functions, a clear menu structure and a responding and at the same time versatile remote control. Only the small range of the infrared giver is cause for concern, above all if the projector is placed behind the seating position. Another point of criticism is the remarkable green light emitting diode constantly flashing in the Standby, which especially in half dark rooms in the evening can strike a nerve. The grasp to tape is probably inevitable.
Concerning image quality, as already detailed described, a solid achievement from appealing picture depth, good colors and high image definition (with digital feeds), which above all only show in small details (sharpness adjustment of the optics, chroma bug) that this concerns a favorable entry level projector.
All in all it is astonishing how DLP manufacturers such as Optoma have succeeded lately in achieving absolutely impressing picture results at competitive prices. The HD72i is a good example for the fact that one must not spend a fortune on a genuine cinema experience at home in the year 2006. On the contrary, large picture projection is increasingly more favorably than qualitatively comparable televisions / flat screens. This is a trend about which every home cinema fan can only be pleased. We absolutely recommend a personal demonstration of the HD72 at a shop nearby!
5. Evaluation
+ Two digital picture inputs
+ Outstanding De-Interlacer
+ HD & XGA compatible resolutions
+ Quiet ventilation with good dust security
+ Pleasing Design
+ Clear menu guidance
+ Good factory settings
+ Good Overscan & Blanking options
- Optics not easy to adjust
- High offset
- Small range of the remote control
- Few details with analog feeds
- Chroma bug with digital HDMI YPbPr - feeds
- Disturbing flashing light emitting diode in the Standby mode
Evaluation overall : 2 (Good) |
|
Equipment |
1,7 (Good +) |
Operation |
2,1 (Good -) |
Technology |
2,1 (Good) |
Picture |
2,2 (Good -) |
Price / Performance |
1,4 (Very good -) |
(all evaluations refer to the respective kind of projection and the current state of the art. A direct system-spreading comparison is only conditionally possible therefore!)
Translation: Den Walterfang (25-05-2006)
6. Technical details (manufacturer data):
- Display Technology: Single 0.65-inch DarkChip2™ DLP™ technology from Texas Instruments
- Brightness: 1300 lumens (typical)
- Weight: 7 pounds (3.2 kg)
- Resolution: 1280 x 768 Native
- Maximum Resolution: PC: UXGA (1600 x 1200); Video: 1080p(1920 x 1080)
- Dimensions (W x H x D): 13.56 x 3.72 x 9.67 inches (344 x 94 x 246 mm)
- Contrast Ratio: 5000:1 in ImageAI mode, 3500:1 (Full On/ Full Off)
- Noise Level (typical): 27 db standard (typical)
- Lamp Type and Life: 220W P-VIP, 3000 hours STD
- Image Size (Diagonal): 28 to 304 inches (0.7 to 7.7 meters)
- Projection Distance: 3.9 to 39 feet
- Computer Compatibility: UXGA, SXGA+, WXGA, XGA, SVGA, VGA Compression, VESA standards, PC & Macintosh compatibles
- Video Compatibility: NTSC (M, 3.58/4.43 MHz), PAL (B, D, G, H, I, M, N), SECAM (B, D, G, K, K1, L), EDTV(480i/p, 576i/p), HDTV (720p, 1080i/p)
- Aspect Ratio: 16:10 widescreen native with support for 4:3 and 16:9
- Projection Lens: F/2.5 - 2.8, f = 22.25 -26.69 mm, 1.2x Manual focus/Digital zoom
- Keystone Correction: Horizontal and Vertical
- Throw Ratio: 1.58 to 1.90 (distance/width)
- Horizontal Scan Rate: 15-75 KHz
- Vertical Refresh Rate: 43-85 Hz
- Power Supply: 100-240 volts, 50-60 Hz
- Power Consumption: 285 watts +/- 10% Full Power, <13W Standby Power
- Operating Temperature: Operating: 5-35C, 80% humidity (Max.)
- Storage: -20-60C, 80% humidity (Max.)
- Displayable Colors: 10-bit per channel color processing
- Projection Method: Front/rear/ceiling mount/table-top
- Uniformity: 90%
- I/O Connectors: HDMI, DVI-I w/HDCP, Component Video, Composite video (RCA), S-Video, RS-232, Two IR receivers, Dual 12+12V trigger relays
- Standard Accessories: Composite video cable, S-video cable, Remote control, baterry for remote, lenscap, User's Manual, quick start guide, warranty card, power cord.